Well, Stefanie knows it better… Stefanie is one of our silver sisters living in the US Pacific Northwest and just turned 50 in March 2020. She has beautiful long hair and never wanted to cut them off for her silver hair transformation.
During her growing out gray hair, she was willing to get it bleached and toned, so after her 13 months grow out, she bleached her hair herself. In this post, she shares her formula and step-by-step process of gray blending.
DISCLAIMER AND CAUTION:The views and opinions expressed in this article are those of the author and do not necessarily reflect the official policy of the website. It is advisable to bleach hair under the supervision of an expert. As the author is not an expert, and it is her personal experience, you must take caution if you try this yourself. DO NOT TRY THIS IF YOU HAVE ALREADY DAMAGED/WEAK HAIR.
Premature grey runs in my mom’s family; she was completely salt and pepper by her mid 30’s, and I was super annoyed to find my first silver hairs in my late teens.
I started dyeing my hair regularly at about age 26, and after 22+ years, the roots looked solid white between colouring, and I was colouring it at home every two weeks.
I didn’t even think about it at the time; I just dyed it. I believed all the stereotypes: grey hair makes you look old, invisible, and frumpy.
If you’d asked me at age 48, I would have said, “NO way, I’ll go to my grave with dyed brown hair.” I didn’t want my young-looking husband to get asked if he was taking his MOM out to dinner… 🙂
Then I started seeing the trend of young women bleaching and dyeing their hair silver on purpose.
This led me to browse on Pinterest and Instagram, and I saw many beautiful women of all ages ROCKING their natural (and long) silver hair. And I wondered every time I dyed it, “What if I’m covering up something cool? What if I’m one of the cool kids, and I don’t even know it? Why not find out?”
I credit the Instagram lovely @silverdisobedience with being my first true inspiration.
I started an Instagram page of my own, @longhairgoingsilver. I realized there’s a whole GIANT COMMUNITY of beautiful and inspirational women out there, doing the same thing, in so many different ways, for so many reasons, and rocking all of it. And they’re here for you every day!
At 13 months into my “cold turkey” transition, I started thinking, “Why not try bleaching it myself?”
Yes, HUGE risk, but Jack is kind enough to share his entire method, the products, the processing time, the follow-up, and the use of Olaplex. I’ve never applied ANY bleach to my hair, so it was a scary step.
I ordered all the supplies that Jack Martin so kindly shares in his inspiring posts.
Before I give you all the step-by-step of how I did this, let me state clearly, for the record. DO NOT TRY THIS AT HOME unless you are, really, really, REALLY sure you’re OK with the result possibly being an actual hair disaster.
Also, please do not show up in my DMs crying and asking me why it didn’t work on your hair or how to fix it. I don’t know. I’ve never done this before, except on my hair, which I know very well. Ready? Ok then.
After doing the Olaplex 5 and the oil mask listed above, I bleached and toned a test strand (on dry hair) first because I wanted to KNOW if it was going to roast my hair off. I’d instead just be missing a strand than, you know, the entire front of my head of hair.
I didn’t write down the mix amounts used for my test strand because it was a very small section, so I will move on to what I used AFTER the test strand was done. I can’t stress enough to do a test strand. DO A TEST STRAND.
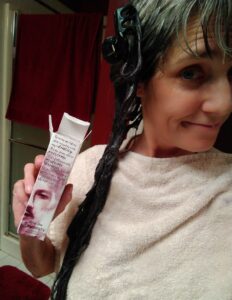
For the actual bleaching, I mixed ½ oz of the Wella Blondor Freelights Bleaching powder and ¾ oz of the 30v developer at a 1:1.5 ratio (following the instructions on the bottles) mixed well, then added ¾ ts of Olaplex No 1. DO NOT SKIP THE OLAPLEX HERE, OR YOU WILL MELT YOUR HAIR OFF.
My hair is very white in front and almost solid charcoal/dark in the back. So I sorted out small sections of my white hair in the front, pinned up my dark hair in the back, and applied the bleach mixture with a brush to JUST the brown dyed growth from the demarcation line to the ends, leaving my natural silver roots untouched as much as possible.
I saturated the whole section top and bottom with the bleach, then wrapped each section carefully in Glad Press-n-Seal (so I could watch the colour process without unwrapping) and let the bleach do its work for 50 minutes.
After 50 minutes of bleach processing, I remixed a new batch of the bleach/developer/Olaplex No.1 mixture, removed the plastic wrap from each section one at a time, and REAPPLIED bleach to each section, without rinsing, right on top of the prior bleach.
I re-wrapped each section before moving to the next and set the timer for another 50 minutes.
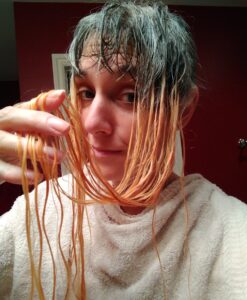
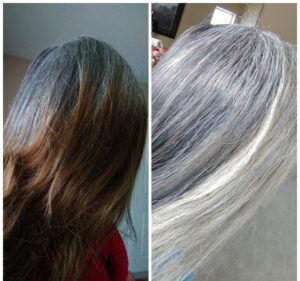
After another 50 minutes, my hair was the same colour as my test strand (i.e. a horrifying peach colour, not as pale level 10 blond as Jack gets, but I was too scared to bleach for any longer). I removed the plastic wrap and rinsed the bleach out really well.
After rinsing and towel drying my newly bleached bits, I mixed Wella Blondor Pale Silver Toner with Guy Tang MyDentity volume 6 Developer and Wella Brass Kicker (following the mixing instructions on the bottles).
I applied this toning mixture carefully to just the previously bleached bits, having kept them separate from the rest of my dark hair.
I took extra care to cover every hair with the toner to avoid warm color spots showing up at the end (and even needed to re-tone twice more that night, but we’ll come to that).
I only mixed enough for one application because toner and developer oxidize after a bit and aren’t effective if not used immediately. So I re-wrapped each toned section with the Glad Press-n-Seal, let the toner process on my hair for 20 minutes, and then checked the tone.
Finding some warm spots in the tone of the sections, I then RE-mixed another small amount of the toner/developer/brass kicker, reapplied to the warm spots and left it on for an extra 5-10 minutes, so total pale silver toning time was 25-30 minutes.
WHILE THIS WAS PROCESSING, I also mixed 2 oz of Guy Tang Dark Shadows permanent toner with his volume 6 developer and applied it to the rest of my unprocessed (dark) hair.
In hindsight, I left this on for 20 minutes, which turned out to be too long, and my dark hair turned out very dark charcoal/almost black. Which was OK because it will fade, but I should have left that Dark Shadows toner in for like 5 minutes. Live and learn there.
At the end of the processing time for the silver toner (25-30 minutes), I pulled the plastic wrap off, jumped in the shower and rinsed my whole head until the water ran completely clear. Then, I got out, towel dried, and checked the tone.
I then applied OLAPLEX NO. 2 repair on just the bleached sections of my hair. While applying this, I also noticed some warm-tone spots in my towel-dried hair, so I ALSO mixed a third bit of the toner/developer/brass kicker up AGAIN and applied it to any peachy spots I could see.
Right on there with the Olaplex No. 2. I left this whole treatment/toner process on my hair for 20 minutes, rinsed well in the shower, and conditioned my entire head with AG Sterling Silver purple conditioner.
After it dried that night, I felt like, WOW, it worked!
Later that night, after it dried.
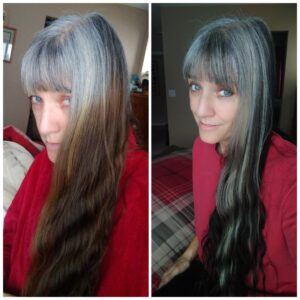
The total start-to-finish time for this process was 3.5 hours, and the result was exactly what I’d hoped!
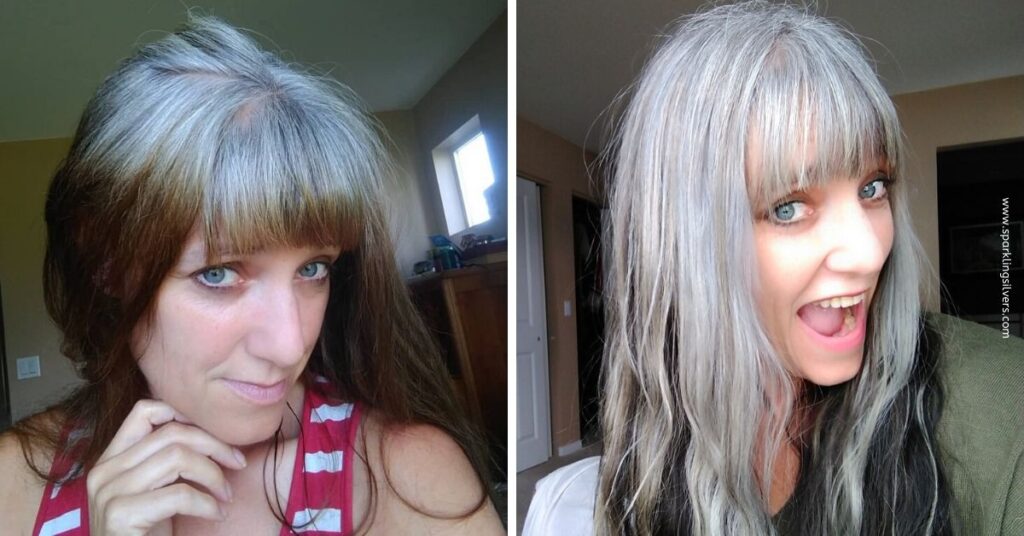
After bleach next day result.
And voila! I was STUNNED and so excited about how it turned out.
No more multi-coloured hair.
No more brassy length.
No more demarcation line.
It felt like I fast-tracked my grow-out and saved about four years of waiting.
The following day and weeks that followed, I nervously watched for breakage or damage, but it came through with flying colours and is still in excellent condition at the time I’m writing this, two and a half months after the first bleaching/toning.
After bleaching and toning, I continued using Olaplex No. 3 and No. 5 each weekly.
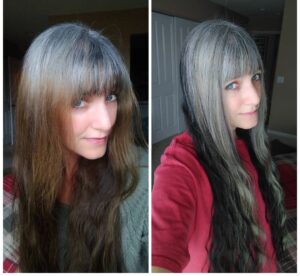
Over the next two weeks, as it settled and faded, I knew that since it hadn’t been bleached to as light a blond as Jack Martin reaches before toning, it was now fading to an odd blond shade that I didn’t like.
Hoping I wasn’t making a huge mistake, I did a full repeat of the bleaching process outlined above for a second time, 18 days after my first bleaching, to get the bleached sections even lighter, and I liked THAT toning even better.
I didn’t take photos of the process for that, but the results are:
FOLLOW-UP ON THE FOLLOW-UP:
The good, the bad, and the ugly. Above is not a do-it-and-forget-about-it process.
If you’re looking to be done with dye, I will NOT do this. You need to keep in mind that the silver toner does fade quickly.
After my second bleaching and toning, it had faded to a much more blond colour than I like and needed toning again, 14 days later, and it needs re-toned around every 2-3 weeks to stay silver, so if you’re hoping this means to tone it and forget, then no, this isn’t a good idea.
For me–I don’t mind the maintenance this will take for the next 4+ years because going this route has allowed me to keep my length and skip ahead to the part where I love my hair and can wear it down again without the demarcation line we all have to deal with during this journey.
I love how the contrast looks, and I’m so glad I decided to give this a try and so thankful to Jack Martin for posting his formulas, so I felt like it wasn’t “impossible”, even though it was pretty nerve-wracking to do on myself.
Another point to write down and re-read is that IF YOU APPLY SILVER TONER on your already virgin silver grown-out hair, you ARE DYEING THAT VIRGIN HAIR.
And the toner will still fade to yellowish blond and need re-toning, hence causing you to feel like you’ve set your grow-out BACK a bit.
So have care that you don’t tone ABOVE your demarcation line, which I didn’t think I had, but it did go there, so now when I re-tone, I do feel like the toner is higher up than my original demarcation line was, so this new look = less progress?
Hard to say. I love that it’s all silver, so I’m rolling with it. But yeah, be aware of that.
I also should point out that I am the LAST person to ask for advice about this – I’m not an expert.
I’ve never bleached OR toned hair before; I feel like I just got lucky! Before you even consider doing something like this, bear in mind: My hair was also in great shape before I bleached it, having never been bleached or had heat applied to it – I haven’t owned a blow dryer in like 20 years.
The biggest thing I’d recommend if you’re even remotely considering trying this is to DO A TEST STRAND first, be really sure you know what your hair can handle, and do NOT NOT NOT skip the Olaplex!!
I want to try this, but I’ve never used anything other than boxed dye – & I’ve been coloring it dark brown (almost black) for about 15yrs. I’ve let my grey roots grow out a few inches & used “Oops!” dye remover last week (lightened it, but that’s about it), but am now stuck. I don’t know whether to bite the bullet & have a colorist have-at it, woman-up & grow it out (line & all), or concede the battle & break out the boxed dye.
One factor to help me decide: how much of a financial investment is it to maintain? Another: how long/difficult is the maintenance process each time? Please enlighten my indecisive mind!
Hi Gina!
Here’s some info from my process: All the products I used to bleach and tone for my initial bleaching, cost around probably $175.00, (but I also ended up with enough Wella Blondor bleach to last several people a lifetime..)
Maintaining it- I continued to use the same toner and brass kicker I had already purchased, so there hasn’t been much additional cost there, except I did buy some more Guy Tang toners on Amazon, can’t remember how much they cost but not too much, maybe $14 for a tube.
My favorite way to maintain has been OverTone Extreme Silver every few weeks (or longer), which is about $35+ for a good sized tub of it. It lasts me a long time because I’m only using it on my front bleached bits rather than my whole head.
Timing: Toner you have to mix with brass kicker and developer. OverTone is just a color-depositing conditioner. After applying either one, you rinse after 10-20 minutes.
I love the way your hair turned out! Great job! I have long hair as well, and so tempted to cut it all off real short to just let it all grow out from there. I have been through what you have been through. I just used what they had at Sallys, a mock olaplex, a charcoal and silver dye and toner. It faded as well, and I bleached again, just like you, dyed it again and it bled past my demarcation line so it set me back with the grow out. Now it looks like I only have about an inch and a half salt and pepper grow out with a light brown demarcation line and a dirty blonde length. I can’t stand it. But I tried Overtone like the girl mentioned above, extreme silver, and it matched better, but there was a lot of green that made it look dull. Even teal in the lighter places. When it faded, I tried it again, but still, it did the same thing on me. I personally do not like it however, she is on the right track with a temporary hair color. Because to dye it again, I am afraid to go over my demarcation line for a second time, (it is very hard not to make a mistake doing the back of your hair) to set me back. So I am trying to find a matching semi permanent hair color that matches salt and pepper. Because the bleached dark blonde after faded dyes, has made my hair look frizzy and dull with no pigment, and with my salt and pepper grow out. For me, at this point I need to be patient, but, maybe a black temporary color will look better and coat the no pigment locks of my mane! lol Thanks for sharing, Stefanie!
Hi….Love how it eventually turned out – kinda edgy!! Question: Why didn’t you try Guy Tang’s MyDentity #9 for the bleaching process…it’s supposed to take brown hair up 9 levels in 1 sitting….


I want to try this, but I’ve never used anything other than boxed dye – & I’ve been coloring it dark brown (almost black) for about 15yrs. I’ve let my grey roots grow out a few inches & used “Oops!” dye remover last week (lightened it, but that’s about it), but am now stuck. I don’t know whether to bite the bullet & have a colorist have-at it, woman-up & grow it out (line & all), or concede the battle & break out the boxed dye.
One factor to help me decide: how much of a financial investment is it to maintain? Another: how long/difficult is the maintenance process each time? Please enlighten my indecisive mind!
Hi Gina!
Here’s some info from my process: All the products I used to bleach and tone for my initial bleaching, cost around probably $175.00, (but I also ended up with enough Wella Blondor bleach to last several people a lifetime..)
Maintaining it- I continued to use the same toner and brass kicker I had already purchased, so there hasn’t been much additional cost there, except I did buy some more Guy Tang toners on Amazon, can’t remember how much they cost but not too much, maybe $14 for a tube.
My favorite way to maintain has been OverTone Extreme Silver every few weeks (or longer), which is about $35+ for a good sized tub of it. It lasts me a long time because I’m only using it on my front bleached bits rather than my whole head.
Timing: Toner you have to mix with brass kicker and developer. OverTone is just a color-depositing conditioner. After applying either one, you rinse after 10-20 minutes.
Hope that helps!
Stefanie
I love the way your hair turned out! Great job! I have long hair as well, and so tempted to cut it all off real short to just let it all grow out from there. I have been through what you have been through. I just used what they had at Sallys, a mock olaplex, a charcoal and silver dye and toner. It faded as well, and I bleached again, just like you, dyed it again and it bled past my demarcation line so it set me back with the grow out. Now it looks like I only have about an inch and a half salt and pepper grow out with a light brown demarcation line and a dirty blonde length. I can’t stand it. But I tried Overtone like the girl mentioned above, extreme silver, and it matched better, but there was a lot of green that made it look dull. Even teal in the lighter places. When it faded, I tried it again, but still, it did the same thing on me. I personally do not like it however, she is on the right track with a temporary hair color. Because to dye it again, I am afraid to go over my demarcation line for a second time, (it is very hard not to make a mistake doing the back of your hair) to set me back. So I am trying to find a matching semi permanent hair color that matches salt and pepper. Because the bleached dark blonde after faded dyes, has made my hair look frizzy and dull with no pigment, and with my salt and pepper grow out. For me, at this point I need to be patient, but, maybe a black temporary color will look better and coat the no pigment locks of my mane! lol Thanks for sharing, Stefanie!
Oh that was you Stefanie that mentioned Overtone. Sorry I didn’t read your name…
Can you tell me how you purchased these products as they are only for licensed stylists? I cannot find them online for the plebeians.
Hi Laura, link to all the products used is given in the post itself. You can purchase them from Amazon.
Hi….Love how it eventually turned out – kinda edgy!! Question: Why didn’t you try Guy Tang’s MyDentity #9 for the bleaching process…it’s supposed to take brown hair up 9 levels in 1 sitting….